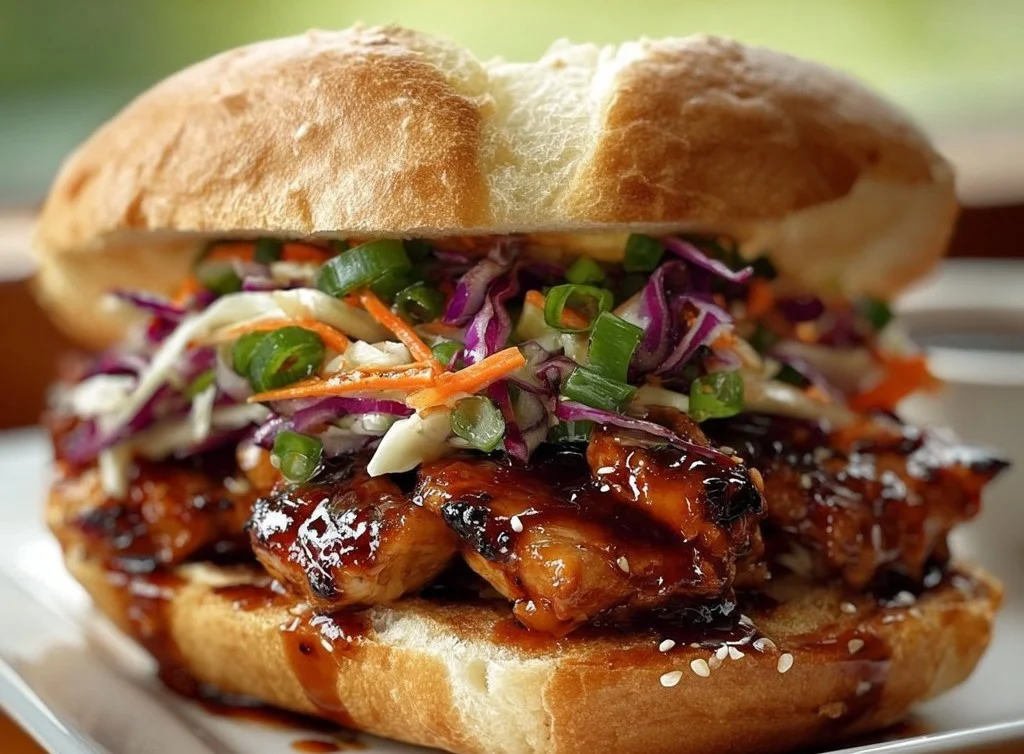
Korean BBQ Chicken Sandwich
Get Ready for Flavors That Wow!
Picture this: juicy chicken thighs slathered in tangy Korean BBQ sauce, nestled inside toasty sandwich rolls topped with crunchy coleslaw. Sounds mouthwatering, right? This Korean BBQ Chicken Sandwich takes just a couple of steps, making it the perfect combination of easy and delicious. Plus, you get a meal that’ll make your taste buds sing. Trust me; you’ll want to whip this up again and again!
Why Make This Recipe
So, why should you fire up your grill for this delight? Here are a few tasty reasons:
- Quick to Make: You can have this sandwich ready in 30 minutes, which means more time for Netflix and chilling (or whatever you do for fun 😄).
- Affordable Ingredients: No fancy-schmancy chef’s pantry needed here. All the goodies are easy to grab at your local store, saving you cash.
- Everyone Loves It: This sandwich is so good that even your picky eaters will dive in without hesitation. Who doesn’t love a BBQ treat?
Ingredients
You don’t need fancy stuff — just these basics!
- 4 boneless, skinless chicken thighs
- 1 cup Korean BBQ sauce
- 4 sandwich rolls
- 1 cup coleslaw mix
- 1/4 cup mayonnaise
- 1 tablespoon rice vinegar
- Sliced green onions for garnish
- Sesame seeds for garnish
Directions
Ready to get grilling? Let’s go!
- Marinate the chicken thighs in Korean BBQ sauce for at least 30 minutes.
- Preheat the grill to medium-high heat and grill the chicken for about 6-8 minutes on each side, or until cooked through.
- While the chicken is grilling, mix the coleslaw mix, mayonnaise, and rice vinegar in a bowl.
- Remove the chicken from the grill, let it rest for a few minutes, then slice it.
- Toast the sandwich rolls, then layer the grilled chicken, coleslaw mixture, and top with sliced green onions and sesame seeds.
- Serve immediately and enjoy your delicious sandwich!

How to Make Korean BBQ Chicken Sandwich (Overview)
So, what’s the game plan? First, you’ll marinate the chicken—easy peasy. While it’s soaking in the goodness, get your grill heated. Next, toss together the coleslaw mix for that perfect crunch. Once the chicken’s cooked, it’s all about assembly—rolls, chicken, and slaw, oh my! And don’t forget to toast those rolls for extra flavor. Pro tip? Let the chicken rest before slicing; it keeps all those juicy bits in!
How to Serve Korean BBQ Chicken Sandwich
Thinking of creative ways to devour this beauty? Consider adding some crushed toasted peanuts for an extra crunch or a drizzle of sriracha for a spicy kick! Picture this: the sandwich is a gorgeous golden brown, with bright green onions peeking out, and the aroma wafting through your kitchen makes it impossible to resist. Pair it with a side of sweet potato fries or crispy pickles, and you’ll feel like it’s a gourmet feast.
How to Store Korean BBQ Chicken Sandwich
Got leftovers? Lucky you! This sandwich stays good in the fridge for up to 3 days. Want to keep it longer? Freeze the grilled chicken separately, and it’ll last for up to 3 months. When reheating, pop it in the oven for that crispy texture, or use the microwave if you’re in a hurry. Just know that toasted rolls are best enjoyed fresh!
Tips to Make Korean BBQ Chicken Sandwich
Here are a few insider tricks for the ultimate sandwich experience:
- Use dark meat like thighs for juiciness – they won’t dry out as easily as chicken breast.
- If you can, grill the chicken on high heat for those beautiful grill marks and charred flavor.
- If you’re short on time, use store-bought coleslaw (we won’t tell 😉).
- Toss in some sliced cucumbers for extra crunch.
- A quick squeeze of lime over the finished sandwich adds a wonderful zing!
Variations
Feel like mixing things up? Try swapping the chicken for tofu or portobello mushrooms for a vegan twist. You can also play around with the BBQ sauce—experiment with honey garlic or a sweet chili sauce if you’re feeling adventurous!
FAQs
Can I make this sandwich ahead of time?
Sure! Just prepare the chicken and coleslaw in advance. Assemble the sandwich when you’re ready to eat.
What can I substitute for Korean BBQ sauce?
Soy sauce mixed with a bit of honey and garlic can work as a substitute in a pinch.
Is there a way to make this sandwich healthier?
Yep! Use whole grain rolls and load it up with extra veggies in that coleslaw mix. Healthified and delicious!
📌 Pin this recipe for your next cozy dinner night!

Korean BBQ Chicken Sandwich
Ingredients
Method
- Marinate the chicken thighs in Korean BBQ sauce for at least 30 minutes.
- Mix the coleslaw mix, mayonnaise, and rice vinegar in a bowl.
- Preheat the grill to medium-high heat.
- Grill the chicken for about 6-8 minutes on each side, or until cooked through.
- Remove the chicken from the grill, let it rest for a few minutes, then slice it.
- Toast the sandwich rolls.
- Layer the grilled chicken, coleslaw mixture, and top with sliced green onions and sesame seeds in the toasted rolls.
- Serve immediately and enjoy your delicious sandwich!